Detecting Blurry Images with the Variance of the Laplacian
Detecting blur in an image is a fundamental and surprisingly hard problem. There is no universal approach to measuring how blurry an image is. What’s more, there is no drop-in solution, no library you can just add to your app to get blur detection.
Still, there are a few approaches that can answer the question “is this image partially or completely blurry?”
Most of them are based on algorithms that analyze the edges in the image and use that information to estimate how blurry or sharp it is.
The most common approach is to calculate the variance of the Laplacian for the image and then interpret the resulting value.
How it works
Pretty much any image analysis starts with getting the brightness of every pixel and putting these values into a matrix. In practice, this means converting the image to grayscale, which is exactly a map of brightness.
Next, we need a filter matrix (a kernel) to apply to the image. This operation is called convolution, and its result is an image where the edges of objects are clearly highlighted.
The kernel looks like this:
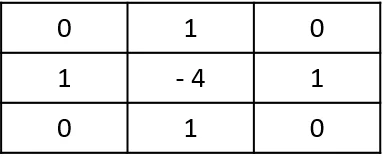
Applying it to an image gives the following result (on the left is the original converted to grayscale, on the right is the result of the convolution):
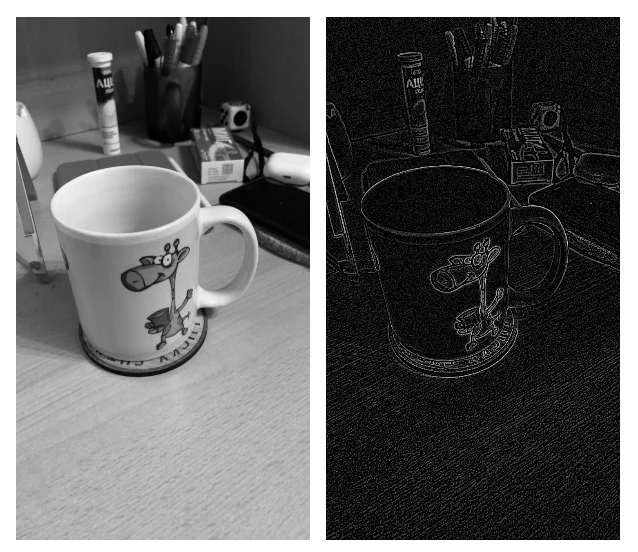
As you can see, the edges of objects are clearly visible on the right, and that’s what lets us measure how blurry the image is. In a blurry image the edges are much less pronounced, so by analyzing them we can tell how sharp the image is.
But at this point all we have is the resulting matrix, and that alone doesn’t tell us how sharp the image is. To reduce the matrix to a single number, we calculate its mean and standard deviation. In practice, the standard deviation alone is enough.
Once we have the standard deviation, all that’s left is to calculate the variance, which becomes our measure of how sharp or blurry the image is. The variance is simply the standard deviation squared.
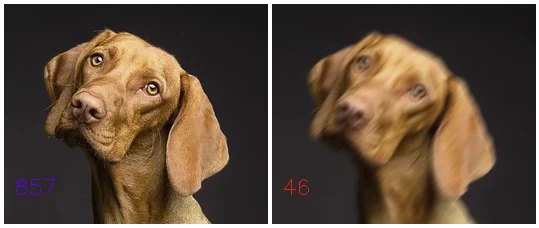
The image on the left has a Laplacian variance of 857, and it looks sharp to us. The one on the right has a variance of 46, and it is clearly blurry.
So with this method we can calculate the variance of the Laplacian for any image. But what do we do with that number?
The variance of the Laplacian is neither binary nor normalized, so it can’t tell us “yes, this image is blurry” on its own. Besides, whether an image looks blurry is subjective in the first place. That’s why we need a threshold to compare the value against and decide whether the image is blurry or not.
After experimenting with a range of images, I settled on a threshold of 150, and that’s the value the implementation below compares against.
In short: if the variance of the Laplacian is below 150, the image is considered blurry; if it’s above, the image is sharp enough.
Putting it to work
There are several ways to calculate the variance of the Laplacian.
Apple has its own implementation, but it turned out to be rather unstable in my tests. It also requires iOS 16, because it relies on newer Accelerate APIs, namely vImage.PixelBuffer.
So I decided to write my own implementation using OpenCV. Here is the final version:
func calculateLaplacianVarianceOpenCV(for image: CGImage) -> Double {
    let src = Mat(cgImage: image)
    let gray = Mat()
    Imgproc.cvtColor(src: src, dst: gray, code: .COLOR_BGR2GRAY)

    let laplacianImage = Mat()
    Imgproc.Laplacian(src: gray, dst: laplacianImage, ddepth: CvType.CV_64F)

    let mean = DoubleVector()
    let stddev = DoubleVector()
    Core.meanStdDev(src: laplacianImage, mean: mean, stddev: stddev, mask: Mat())

    let variance = stddev.get(0) * stddev.get(0)
    return variance
}
Run this function for every image and compare the result with the threshold of 150.